please dont rip this site

AOLpress Logo

Creating pages

Creating tables
Another way to organize text in your Web pages is to use tables. For example, this workbook uses tables to put the instructions in the left column and let you practice in the right column. It also uses tables to restrict the width of the text in this paragraph and others like it. (The table is invisible because it has no border. You can make the edges of tables, lists, and forms more obvious by choosing
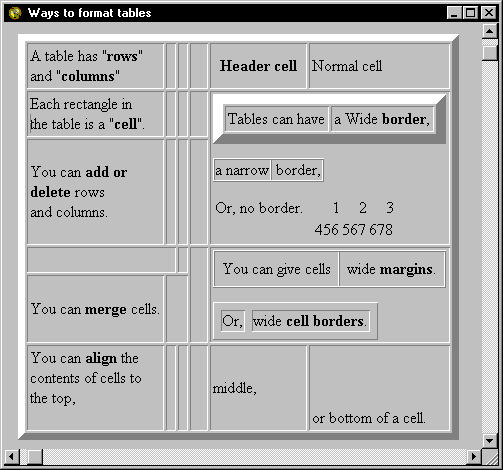
 FormatShow Borders.)

If you've created tables by writing HTML code before, you know that they can be painful to create. AOLpress has changed that by providing WYSIWYG table editing. It's easy to use and gives you a lot of control over the table format.

Just click on the aspect of table formatting you want to learn about in the picture below. (The "Tips and Tricks" section explains some more advanced ways to format tables by editing the HTML code directly.)

Tables: [ Creating | Add or Delete Cells | Merge Cells | Alignment
| Header Cells | Borders | Margins ]


Creating Tables

Creating a table is simple with AOLpress. The HTML code that AOLpress creates is fairly complex, so you'll be glad that AOLpress does the work for you.

  1. Highlight the text in the column to the right with your mouse.
  2. Choose TableCreate Table. You'll see a window that lets you create a table and control some basic table formatting.
  3. Change the Rows field to 3.
  4. Click OK. The paragraphs you selected will become cells in a table and there will be an extra row in the table.
  5. Put your cursor in the table and experiment by typing some text.
   Try it here:
Paragraph 1

Paragraph 2

Paragraph 3

Paragraph 4

That's all there is to creating a table. You can also create a table without selecting anything first. You just decide how many rows and columns you want to start with and click OK in the Table window.

You can type directly into the empty cells. And, you can put anything you like into a table cell -- text, images, lists, forms, and even other tables.


Adding or Deleting Rows and Columns

You may change your mind about the number of rows and columns your table needs after you 've already put text inside the table. You can easily change the number of rows and columns.

  1. Put your cursor in a cell in the second column and choose TableAlterInsert Column. You'll see a new column to the left of the second column. (Notice that when you insert columns and rows, they are added before the column or row that contains your cursor.)
  2. Put your cursor in a cell in the last row of the table to the right and choose TableAlterDelete Row.
  3. You will see a window that says at least one of the cells is not empty and asks if you really want to delete it. Click Delete. That row and its contents will disappear.
  4. Suppose you want to add a row or column to the end of the table. To do this, choose TableAlterLayout. Increase the number of rows or columns in the window that appears and click OK.
   Try it here:
Row 1, Column 1 Row 1, Column 2
Row 2, Column 1 Row 2, Column 2
Row 3, Column 1 Row 3, Column 2


Merging Cells

Your table doesn't need to be a regular grid of cells. You can combine cells to make them span more than one column or more than one row. For example, in the table below, the left column containing the instructions has one cell and the right column has two cells. This is because the cell on the left was merged to span two rows.

  1. Put your cursor in a cell in the table to the right.
  2. Choose TableMerge Cell. You'll see a window that lets you choose how many columns and rows you want this cell to span.
  3. Change the number of columns and rows and click OK to see what happens. (You can't span more columns or rows than there are to the right of this cell or below this cell.)
  4. Experiment with merging cells to make a pattern.
  5. If you want to "unmerge" a cell, put your cursor in the cell and choose TableSplit Cell.
   Try it here:


When you merge cells, only the text in the upper-left cell remains. Before you merge cells, you may want to cut and paste the text in those cells to another part of your page so it won't be erased.


Aligning Cells

The contents of a cell are normally aligned to the left of the cell and in the middle from top to bottom. You can change this if you like.

  1. Put your cursor in the cell that says "top". Then, choose TableV Align CellTop to vertically align the text to the top of the cell.
  2. Align the cell that says "bottom" to the bottom of the cell the same way.
  3. Put your cursor in the cell that says "center". Then, choose FormatParagraphAlign Center to align the text to the center of the cell.
  4. Align the cell that says "right" to the right the same way.
   Try it here:
                                                  
     left center right

top middle bottom
You can also align an entire row vertically by choosing one of the TableV Align Row options.


Creating Header Cells

Header cells are cells that provide information about the cells that follow to the right or below. Header cells don't have to be the top row of cells or the left column of cells. You can make any number of cells header cells. You can add any other paragraph or type formatting, too.

  1. Put your cursor in the cell that says "Size".
  2. Choose TableHeader Cell. The text will be centered and bold.
  3. Change the cell that says "Color" to a header cell also.
  4. You can change a cell back to a normal cell by choosing TableNormal Cell.
  5. Add more formatting to the text using FormatType Color or any other format you learned to use in the lesson on creating text.
   Try it here:
Size Color
Item 1

6"

red
Item 2

    14"

blue    


Changing Table Borders

Table borders show the divisions between cells in a table. If you are using a table to align numbers or data, you'll probably want the table's borders to be visible. If you are using a table for something else (such as indenting all the text from the left margin, or putting images in one column and text in another), you'll probably want to hide the borders.

  1. Put your cursor in any cell of the wide-bordered table to the right, and choose TableAlterLayout.
  2. Change the number in the Border Size field. You can make the number bigger or smaller. Then, click OK to change the width of the border.
  3. Choose TableAlter Layout, again. This time, uncheck the Visible Borders field and click OK. The table borders disappear, but the table is still there.
  4. You can choose TableAlterLayout again to restore the table border.
   Try it here:
1 2 3 4
5 6 7 8
9 10 11 12
13 14 15 16
If you plan to hide the table borders, you'll probably find it easier to design the page with the borders visible. When the table is finished, you can hide the borders. You can also see the edges of tables, lists, and forms if you choose FormatShow Borders. The dotted line borders you will see aren't visible to other people.


Changing Cell Margins and Borders

You can control the look of your tables even more by changing the margins around the contents of the cells and the width of the lines between the cells.

  1. Put your cursor in any cell of the wide-bordered table to the right, and choose TableAlterLayout.
  2. Increase the number in the Padding field and click OK. Notice that the margins around the numbers in the table get bigger.
  3. Choose TableAlterLayout again.
  4. This time, increase the number in the Spacing field and click OK. Notice that the lines between the cells get wider.
   Try it here:
1 2 3 4
5 6 7 8
9 10 11 12
13 14 15 16

The "Tips and Tricks" section explains some more advanced ways to format tables by editing the HTML code directly. You'll learn how to add the table formatting tricks this page uses (changing the background color of an individual cell, controlling the width of a table, and centering the table on a page).

Now you know how to create tables. You can put anything inside a table, even another table as you've seen above. You can also put images inside tables. For more information, see the chapter on tables in the AOLpress User's Guide.

We'll learn how to add images to pages in the next lesson. Don't forget to choose FileSave to save your changes to this page.


HomeTOCNextGlossaryIndex
[ Home | Contents | Previous | Up a Level | Next | Glossary | Index ]
Copyright © 1997 America Online, Inc.

file: /Techref/language/html/HELP/tutorial/tables.htm, 20KB, , updated: 1997/3/23 18:29, local time: 2024/3/28 22:11,
TOP NEW HELP FIND: 
54.210.85.205:LOG IN

 ©2024 These pages are served without commercial sponsorship. (No popup ads, etc...).Bandwidth abuse increases hosting cost forcing sponsorship or shutdown. This server aggressively defends against automated copying for any reason including offline viewing, duplication, etc... Please respect this requirement and DO NOT RIP THIS SITE. Questions?
Please DO link to this page! Digg it! / MAKE!

<A HREF="http://ecomorder.com/techref/language/html/HELP/tutorial/tables.htm"> AOLpress: Creating tables</A>

After you find an appropriate page, you are invited to your to this massmind site! (posts will be visible only to you before review) Just type a nice message (short messages are blocked as spam) in the box and press the Post button. (HTML welcomed, but not the <A tag: Instead, use the link box to link to another page. A tutorial is available Members can login to post directly, become page editors, and be credited for their posts.


Link? Put it here: 
if you want a response, please enter your email address: 
Attn spammers: All posts are reviewed before being made visible to anyone other than the poster.
Did you find what you needed?


Welcome to ecomorder.com!


Welcome to ecomorder.com!


  .